Understanding A2A: The Protocol for Agent Collaboration
Posted on 30 Apr 2026
Introduction
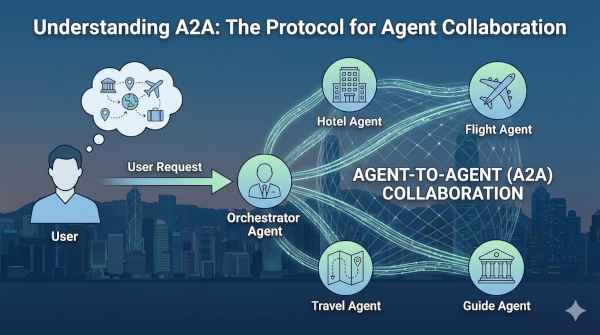
Imagine you need to plan a complex trip abroad. You contact a travel agency, and they need to coordinate multiple tasks:
- Book a hotel in your destination city
- Reserve flights with the best connections
- Plan an itinerary of places to visit
- Purchase tickets for museums and attractions
Each of these tasks is complex enough to require specialized expertise. In an ideal world, you’d have dedicated agents handling each responsibility:
- A hotel agent that knows the best accommodations
- A flight agent that finds optimal routes and prices
- A travel agent that plans your daily activities
- A guide agent that books tickets and tours
But here’s the challenge: how do these agents communicate and coordinate with each other?
This is exactly the problem that A2A (Agent-to-Agent), Google’s new protocol, solves. It provides a standardized way for AI agents to discover, communicate, and collaborate — regardless of how they’re implemented or who built them.
In this article, we’ll explore how A2A works, its architecture, and why it matters for the future of multi-agent systems.
The Multi-Agent Challenge
AI agents are proliferating across the industry. Companies are building specialized agents using different frameworks, languages, and approaches. But without a common standard, these agents remain isolated islands — unable to work together on complex problems.
Think of it like the early days of the web, before HTTP became the standard. Every system had its own way of communicating, making integration a nightmare.
A2A aims to be the HTTP for AI agents — a universal protocol that enables:
- Dynamic discovery: Agents can find each other and understand capabilities
- Standardized communication: A common language regardless of implementation
- Task coordination: Managing long-running, multi-step workflows
- Multi-modal content: Sharing text, files, structured data, and more
- Enterprise security: Built-in authentication and authorization
The protocol is already gaining traction, with major companies committing to support it. This isn’t just another framework — it’s becoming an industry standard.
A2A Architecture: The Three Layers
When you build an A2A-compliant agent, you’re actually implementing three distinct layers. Understanding this separation is crucial.
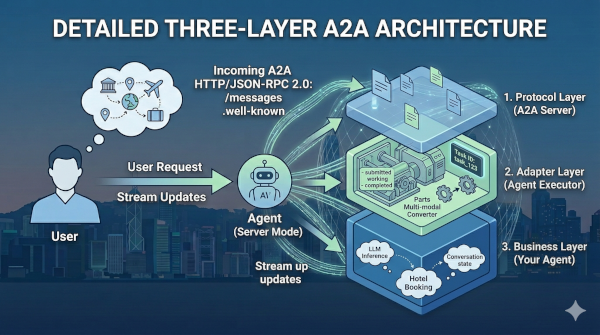
Let’s break down what happens when one agent needs to communicate with another:
- A user sends a request to a client (typically a SaaS service)
- The client forwards the request to an Agent acting as a client
- This agent communicates with another Agent acting as a server
- Messages flow via HTTP using JSON-RPC 2.0
Every A2A agent can function as both client and server, depending on context. This flexibility enables complex orchestration scenarios.
The architecture consists of three layers:
- Protocol Layer (A2A Server): this is the outermost layer that handles the A2A protocol itself.
- Adapter Layer (Agent Executor): this layer adapts the generic A2A protocol to your specific agent framework.
- Business Layer (Agent): this is where your actual agent logic lives.
Let’s examine each layer in detail.
Protocol Layer: The A2A Server
The Protocol Layer is responsible for handling all A2A protocol mechanics. You typically don’t write this from scratch — Google provides an SDK that implements it.
Here’s what a basic A2A server looks like:
from a2a.server import Server

server = Server(executor=executor)
await server.start()
That’s it. The SDK handles:
- HTTP request management (built on FastAPI)
- A2A protocol implementation
- Standard endpoints:
/messagesand/.well-known/agent.json - Server-Sent Events (SSE) for streaming responses
- Request validation according to A2A specification
- Authentication and authorization
The Protocol Layer is completely generic. It knows nothing about your agent’s business logic — that’s by design. This separation ensures that A2A remains framework-agnostic.
Adapter Layer: The Agent Executor
The Adapter Layer is where you bridge the gap between the generic A2A protocol and your specific agent implementation.
This is the code you write to integrate your agent with A2A. The executor’s responsibilities include:
Task Lifecycle Management
Every A2A request creates a task with a unique ID and status:
submitted— Task receivedworking— Agent is processinginput_required— Agent needs more informationcompleted— Task finished successfullyfailed— Task encountered an error
The executor manages these state transitions.
Input Extraction
The executor extracts relevant data from A2A messages and converts them into a format your agent understands.
Data Parts Handling
A2A messages can contain multiple parts:
- Plain text
- Files (PDFs, images, etc.)
- Structured JSON data
- Multi-modal content
The executor processes these parts and routes them appropriately.
Event Propagation
For long-running tasks, the executor uses an EventQueue to stream progress updates back to the client via Server-Sent Events (SSE).
This allows clients to receive real-time updates like:
Task created: task_123
Status: working
Progress: Analyzing document...
Status: completed
Result: [summary data]
The Adapter Layer is your integration point. It translates between A2A’s standardized protocol and your agent’s specific implementation — whether that’s LangGraph, LangChain, or a custom framework.
Business Layer: Your Agent
This is where your actual agent lives. The Business Layer implements:
- Business logic: The core functionality your agent provides
- LLM interactions: Calling language models to generate responses
- Tool execution: Running functions, APIs, or external services
- Conversation state: Managing context across multiple interactions
- Report generation: Producing final results
The beauty of A2A is that this layer remains completely independent. You can use any framework, any model, any architecture — as long as the Adapter Layer properly translates to and from A2A protocol.
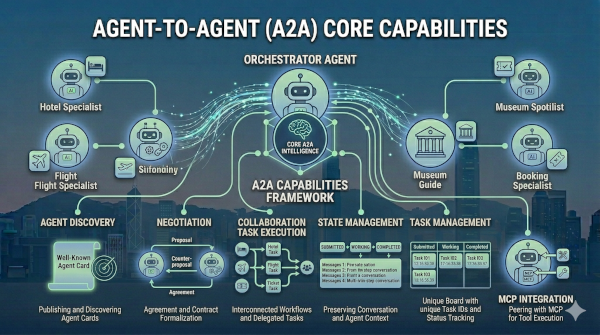
A2A Capabilities
Now that we understand the architecture, let’s explore what A2A enables.
Agent Discovery
Every A2A agent publishes an agent card — a JSON file served at a well-known URL (similar to robots.txt for web crawlers).
This card acts as the agent’s digital business card, containing:
- Agent name and description
- HTTP endpoint for A2A communication
- Available skills and capabilities
- Supported features (streaming, multi-modal, etc.)
- Authentication requirements
Other agents can discover and understand what an agent does without knowing its internal implementation.
Capability Negotiation
Agents negotiate the types of content they can exchange:
- Text messages
- Images and video
- Structured data
- Files and documents
This ensures compatibility before communication begins.
Task Management
For every request, the server creates a task object with:
- Unique task ID
- Current status
- Associated messages
- Artifacts (results)
The client can:
- Poll for status updates using
tasks.get - Stream updates via SSE for real-time progress
- Retrieve final results from
task.artifacts
This pattern supports both quick responses and long-running operations.
Dynamic Collaboration
A2A supports complex multi-agent workflows:
- Agent A delegates subtasks to Agent B
- Agent B might consult Agent C for specialized knowledge
- Results flow back up the chain
- All communication follows the same protocol
This enables sophisticated orchestration without tight coupling.
Agent Discovery in Action
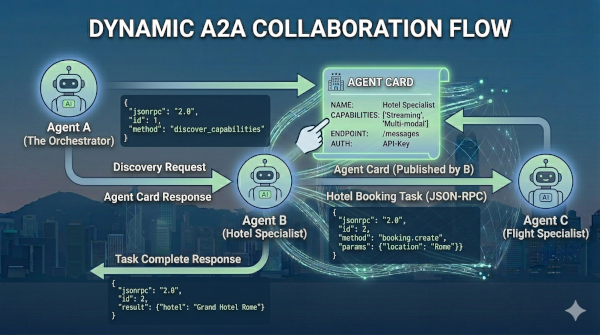
Let’s walk through a concrete example of how agents discover and communicate.
Step 1: Discovery
Agent A wants to use Agent B’s capabilities. It fetches Agent B’s agent card:
GET https://agent-b.example.com/.well-known/agent.json
The response contains everything Agent A needs to know:
{
  "name": "Hotel Booking Agent",
  "description": "Books hotels worldwide",
  "endpoint": "https://agent-b.example.com/messages",
  "capabilities": ["streaming", "multi-modal"],
  "authentication": "api-key"
}
Step 2: Request
Agent A packages its request in JSON-RPC format and sends it via HTTP:
{
  "jsonrpc": "2.0",
  "method": "messages.create",
  "params": {
    "message": {
      "role": "user",
      "parts": [
        {
          "type": "text",
          "content": "Book a hotel in Rome for 3 nights"
        }
      ]
    }
  }
}
Step 3: Task Creation
Agent B’s Protocol Layer receives the request and passes it to the Agent Executor. The executor:
- Creates a task with ID
task_123and statussubmitted - Extracts the message content
- Passes it to the Business Layer (the actual agent)
Step 4: Processing
The agent processes the request. If it’s quick, it responds immediately. If it takes time, it updates the task status to working and streams progress:
Event: task.status
Data: {"task_id": "task_123", "status": "working"}

Event: task.progress
Data: {"message": "Searching available hotels..."}

Event: task.progress
Data: {"message": "Found 15 options, analyzing..."}
Step 5: Response
When complete, the agent updates the task status to completed and includes the result in task.artifacts:
{
  "task_id": "task_123",
  "status": "completed",
  "artifacts": {
    "hotel": "Grand Hotel Rome",
    "confirmation": "ABC123",
    "price": "€450"
  }
}
Agent A receives this response and can continue its workflow.
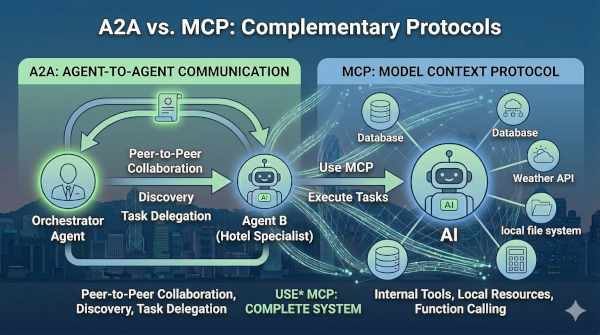
A2A vs MCP: Complementary, Not Competing
You might have heard of MCP (Model Context Protocol), another protocol that’s gained popularity recently. How does it relate to A2A?
They’re complementary, not competing.
MCP: Agent-to-Tool Communication
MCP standardizes how an agent connects to its tools, APIs, and resources. It’s about:
- Function calling
- Accessing external services
- Retrieving data from APIs
- Interacting with databases
Think of MCP as the protocol for an agent’s internal capabilities.
A2A: Agent-to-Agent Communication
A2A standardizes how independent agents communicate as peers. It’s about:
- Agent discovery
- Task delegation
- Workflow coordination
- Multi-agent collaboration
Think of A2A as the protocol for external collaboration.
Using Both Together
In a sophisticated agent system, you’ll often see both:
- Agent A uses A2A to delegate a task to Agent B
- Agent B uses MCP to call its internal tools and gather information
- Agent B returns results to Agent A via A2A
- Agent A uses MCP to store results in a database
They solve different problems at different layers of the stack.
Getting Started with A2A
Ready to build your first A2A agent? Here’s what you need:
Official Resources
- Documentation: goo.gle/a2a
- Python SDK:
pip install a2a-sdk - Sample Code: A2A Samples GitHub
- Tutorial: goo.gle/a2a-tutorial
The A2A Stack
Google recommends this stack (though you can use whatever you prefer):
- Protocol: A2A for agent communication
- Tools: MCP for agent capabilities
- Framework: LangGraph, LangChain, or custom
- Models: Any LLM (OpenAI, Anthropic, Gemini, etc.)
Conclusion
A2A represents a fundamental shift in how we think about AI agents. Instead of building monolithic systems that try to do everything, we can now build specialized agents that collaborate.
The key insights:
- Standardization matters: A2A provides the common language agents need
- Three-layer architecture: Protocol, Adapter, and Business layers keep concerns separated
- Discovery and negotiation: Agents can find and understand each other dynamically
- Task management: Built-in support for long-running, complex workflows
- Complementary to MCP: Use both for complete agent systems
As more companies adopt A2A, we’ll see an ecosystem of interoperable agents emerge — much like the web emerged from HTTP standardization.
The multi-agent future is here. A2A is the protocol that makes it possible.
If you enjoyed this article, don’t forget to give it a clap 👏, share it with your friends 🔗, and follow me for more tips and tutorials on software development 📘. Your support helps me create more content like this — thank you! 🙌