
Build Your Own LLM Chatbot with Python & LangChain (Part 3)
Posted on 27 Feb 2026
Introduction
If you read Part 1 and Part 2, your chatbot can now manage providers, protocols, models, conversation, memory, and configuration — but it still doesn’t know your data.
In Lessons 8 and 9, we implement Retrieval-Augmented Generation (RAG). First, we build a CLI tool called Dataweave to ingest PDFs and Wikipedia pages into a vector database. Then, we enable the chatbot to use that knowledge to answer domain-specific questions.
By the end, your chatbot will move from generic to truly knowledge-aware.
Fine-Tuning vs RAG
There are two main ways to extend an LLM’s knowledge.
Fine-Tuning
The model is retrained on domain-specific data. It works well when the knowledge is stable and doesn’t change often. However, training is expensive and slow — and every update requires retraining again.
RAG (Retrieval-Augmented Generation)
Instead of modifying the model, additional knowledge is stored externally (e.g., in a vector database). When a user asks a question, relevant information is retrieved and injected into the prompt.
In short:
- Fine-tuning changes the model
- RAG enriches the context dynamically
For fast-changing information, RAG is usually the more scalable and practical solution.
How RAG Works
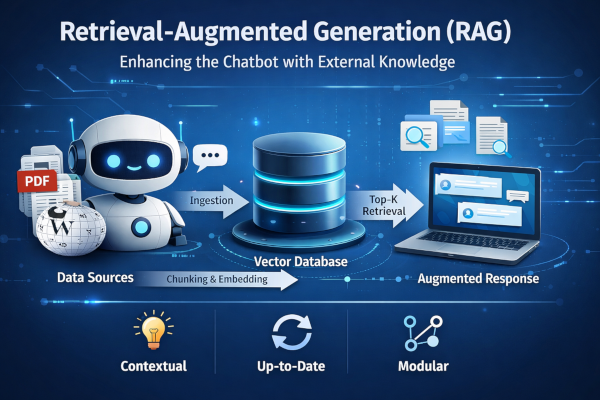
Retrieval-Augmented Generation starts with a simple idea: store external knowledge separately, then retrieve it when needed.
Step 1 — Indexing the Data
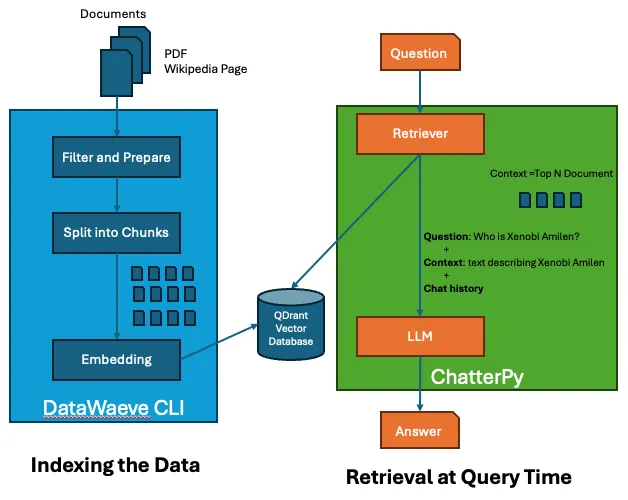
New data (PDFs, Wikipedia pages, documents, etc.) is:
- Filtered and prepared if necessary
- Split into chunks. Optionally with overlap to preserve context between segments
- Converted into embeddings
- Stored inside a vector database
Chunking is essential because LLMs and embedding models work better with smaller, semantically coherent pieces of text rather than entire documents.
Step 2 — Retrieval at Query Time
When a user asks a question:
- The question is converted into an embedding
- The system retrieves the top K most similar chunks from the vector database
- These retrieved documents are injected into the prompt
The final prompt sent to the LLM contains:
- The system message
- The chat history
- The retrieved contextual chunks
- The user’s question
This allows the model to generate answers grounded in relevant external knowledge — even if it was never explicitly trained on that information.
RAG Configuration
Before implementing the vector database, we define the RAG parameters in config.yaml and load them via core/config.py using Pydantic::
rag:
  document_chunk_size: 100
  document_chunk_overlap: 0
  qdrant_path: ~/.qdrant
  qdrant_collection: mycollection
  embedding_protocol: "ollama"
  embedding_model: "llama3.1:latest"
  embedding_vector_size: 4096
  embedding_distance_function: Cosine
Key points:
- Chunks:
document_chunk_sizeanddocument_chunk_overlapcontrol how documents are split for retrieval. - Vector Store:
qdrant_pathandqdrant_collectiondefine storage location and namespace. - Embeddings:
embedding_protocol,embedding_model,embedding_vector_size, andembedding_distance_functiondetermine how text is converted to vectors.
Setting these upfront makes the RAG pipeline configurable and easy to extend.
Vector Store Management with Qdrant
To manage persistent embeddings, we chose Qdrant as our vector database, storing data locally on disk rather than using a remote service.
The design follows a clean abstraction pattern: we define a base Database interface and then implement a concrete QdrantDatabase class.
Base Abstraction
At the core, we define a minimal interface:
class Database:
    def store(self, chunks: Iterable[str]) -> None:
        raise NotImplementedError("Subclasses must implement the store method")
This ensures that every vector database implementation exposes at least a store() method.
Local Qdrant Configuration
The QdrantDatabase class:
- Reads configuration from chatterpy_config
- Expands and validates the local storage path (e.g. ~/.qdrant)
- Creates the directory if it doesn’t exist
- Ensures it is a valid folder (otherwise raises an error)
This guarantees that the vector store always has a consistent and predictable local persistence layer.
Collection Initialization
When the class is instantiated:
- A
QdrantClientis created using the local path - The system checks whether the collection already exists
- If not, it creates it using:
embedding_vector_sizeembedding_distance_function
self._qdrant_client.create_collection(
    collection_name=self._qdrant_collection,
    vectors_config=VectorParams(
        size=embedding_vector_size,
        distance=Distance(embedding_distance_function),
    ),
)
This step is critical because the vector size must match the embedding model output and the distance metric (Cosine, Dot, Euclidean) determines similarity behavior.
LangChain Integration
The implementation leverages:
QdrantClientfor low-level operationsQdrantVectorStorefor seamless integration with LangChain
self._qdrant_vectore_store = QdrantVectorStore(
    client=self._qdrant_client,
    collection_name=self._qdrant_collection,
    embedding=embeddings
)
This allows using high-level methods like:
self._qdrant_vectore_store.add_texts(texts=chunks).
Storing Chunks
The store() method is intentionally simple:
def store(self, chunks: Iterable[str]) -> None:
    if chunks:
        self._qdrant_vectore_store.add_texts(texts=chunks)
Each chunk:
- Is embedded automatically
- Converted into a vector
- Persisted inside the collection
Why This Design Matters
This architecture provides:
- ✅ Clean separation of concerns
- ✅ Pluggable vector database backend
- ✅ Persistent local storage
- ✅ Production-ready initialization checks
- ✅ Compatibility with future extensions
By abstracting the vector store behind a simple interface, the RAG pipeline remains modular, extensible, and maintainable — exactly what you want in a real-world system.
See full code here.
Supported Data Sources
Our chatbot currently supports PDF files and Wikipedia pages. Each source implements a base Source class with load_data and get_text methods.
PDF Example:
from datasources.data_source import Source
from langchain_community.document_loaders import PyPDFLoader
from langchain_core.documents.base import Document
import os

class PDFSource(Source):
    def __init__(self, path: str) -> None:
        self.path: str = path
        self.pages = []
    def load_data(self) -> None:
        if os.path.isfile(self.path) and self.path.endswith(".pdf"):
            loader = PyPDFLoader(file_path=self.path)
            self.pages = loader.load()
        elif os.path.isdir(self.path):
            pdf_files = [f for f in os.listdir(self.path) if f.endswith(".pdf")]
            for filename in pdf_files:
                loader = PyPDFLoader(file_path=os.path.join(self.path, filename))
                self.pages.extend(loader.load())
    def get_text(self) -> str:
        return "".join(page.page_content for page in self.pages)
Wikipedia: implemented separately — see the code here.
These classes provide a uniform interface so that new data sources can be added by extending the Source base class.
Data Ingestion with DataWeave CLI
To populate the vector database, we provide a DataWeave CLI built with argparse. It supports PDF files and Wikipedia pages as data sources. For reference on building Python CLIs, see:
- Building a Python Command Line Interface (CLI) with the Command Pattern
- Building a Python CLI with Click: A Cleaner Approach to the Command Pattern
CLI Example:
import argparse
from datawaeve.datawaeve_cli import DataWeaveCLI

parser = argparse.ArgumentParser(description="DataWeave CLI: populate a vector DB.")
parser.add_argument("--pdf", type=str, action="append", help="PDF file or folder")
parser.add_argument("--wikipedia", type=str, action="append", help="Wikipedia page URL")
args = parser.parse_args()
datawaeve_cli = DataWeaveCLI()
datawaeve_cli.load_pdf_sources(args.pdf or [])
datawaeve_cli.load_wikipedia_sources(args.wikipedia or [])
datawaeve_cli.process_sources()
See full code here.
The Core CLI engine:
DataWeaveCLImanages sources and ingestion.- Uses
TokenTextSplitterto divide text into chunks based ondocument_chunk_sizeanddocument_chunk_overlap - Stores embeddings in Qdrant via
QdrantDatabase - Generates embeddings with
EmbeddingProtocol(configurable per project) - PDF and Wikipedia sources extend the
Sourcebase class for a uniform interface
See full code here.
This design allows adding new data sources easily by implementing the Source interface and updating the CLI.
Retrieval with RAG (Top-K Context)
When RAG is enabled in config.yaml, the chatbot retrieves the most relevant pieces of information from the vector database to augment the LLM prompt.
RAG Handler Example:
from core import chatterpy_config
from databases.qdrant_db import QdrantDatabase
from embeddings import EmbeddingProtocol, EmbeddingProtocolFactory

class RAG:
    def __init__(self) -> None:
        self.rag_enabled: bool = chatterpy_config.rag.enabled
        embedding_protocol: EmbeddingProtocol = EmbeddingProtocolFactory.get_embedding_protocol()
        self.db: QdrantDatabase | None = (
            QdrantDatabase(embeddings=embedding_protocol.embeddings) if self.rag_enabled else None
        )

    def is_enabled(self) -> bool:
        return self.rag_enabled

    def get_context(self, user_message: str) -> list[str] | None:
        return self.db.get_context(user_message) if self.rag_enabled and self.db else None
Integrating RAG in ChatBOT.get_answer():
- In
ChatBOT.get_answer(), check if RAG is enabled. - Retrieve the top-K relevant chunks from the database.
- Add them as a SystemMessage before sending the prompt to the LLM:
# Retrieve context from RAG if enabled
context: list[str] | None = self.rag.get_context(user_message=question) if self.rag.is_enabled() else None

# Add RAG context as SystemMessage
if context:
    context_text: str = "\n".join(context)
    context_message: str = (
        f"RELEVANT CONTEXT:\n"
        f"Use the following information to answer the user's question:\n\n"
        f"{context_text}"
    )
    self._conversation.add_message(message=SystemMessage(content=context_message))
See full code here.
This approach allows the LLM to leverage external knowledge dynamically, keeping responses accurate even for topics outside its initial training data.
Conclusion
In this third article, we added RAG to let our chatbot access external knowledge dynamically via a vector database. PDFs and Wikipedia pages are ingested, split into chunks, and the top-K relevant documents are retrieved to enrich LLM responses.
Next, we’ll implement a UI for a more user-friendly chatbot experience in Part 4.
If you enjoyed this article, don’t forget to give it a clap 👏, share it with your friends 🔗, and follow me for more tips and tutorials on software development 📘. Your support helps me create more content like this — thank you! 🙌