Beyond Push and Pull: Understanding Git's Core Concepts to Avoid Common Pitfalls

Beyond Push and Pull: Understanding Git’s Core Concepts to Avoid Common Pitfalls
Posted on 13 Sep 2025
Introduction
In the previous article I described a branching workflow for large projects. Here I step back to the concepts underneath it.
Have you ever recloned a repository only to “start clean”? Or created a new repo for an urgent task, only to lose track of changes? Maybe you’ve spent hours resolving conflicts that never seem to end.
These are common frustrations with Git. Most developers know the basics — git add, git commit, git push, git pull — enough to survive, but not enough to avoid headaches.
Git is more than a set of commands; it’s a version control system built on simple but powerful ideas. This article walks through them so you can work with Git, not against it.
You should read this article if:
- you know
add,commit,push, andpull, but recloning is your fix for every problem; - you’re not sure what
origin/mainreally is, or where your stashed changes live; - you want to understand where each Git command moves your changes.
Git Key Concepts
Most Git problems come from not fully understanding its model. Here are the essential ideas every developer should know.
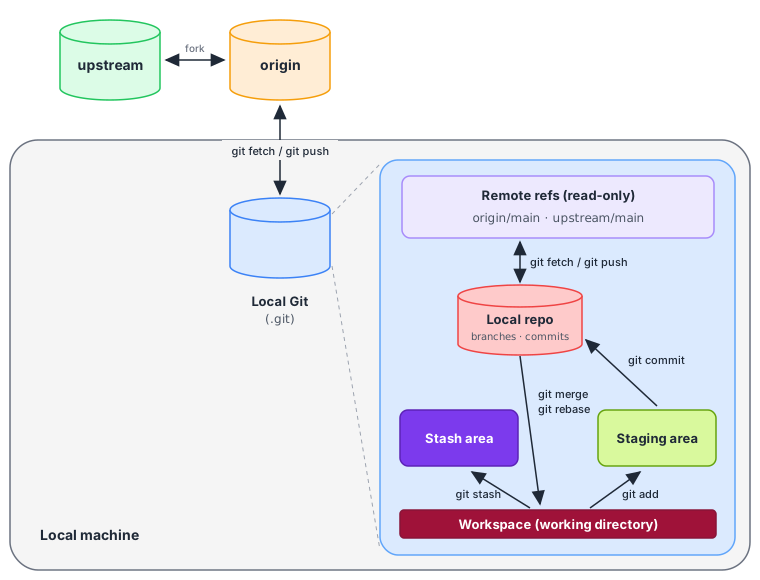 Git key concepts
Centralized vs. Distributed Version Control
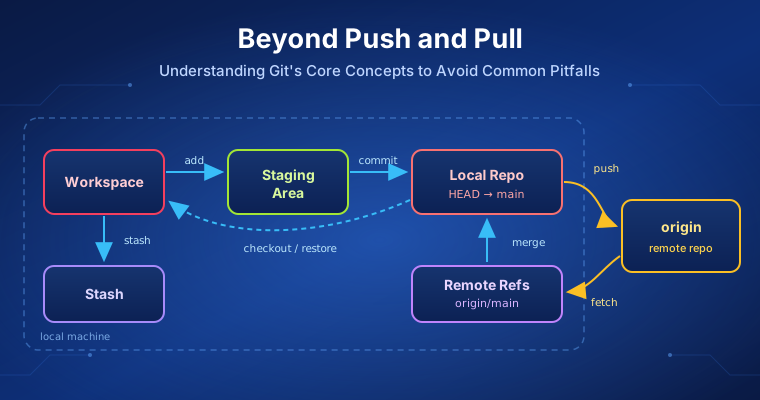
Git is a distributed version control system, not a centralized one. In a centralized system such as Subversion, the history lives on a single server and most operations need the network. In Git, every clone carries the full history (see Pro Git: About Version Control). Almost all commands operate on your local copy; only a few — push, fetch, pull — communicate with the remote repository.
Understanding this distinction is the first step to avoiding confusion.
Origin vs. Upstream
origin: the default remote when you clone (or your fork, if you forked).upstream: the original project you forked from, added by hand withgit remote add upstream <url>(see GitHub: Configuring a remote repository for a fork).
If you didn’t fork, you only have origin.
Local Repository
Your editable part of .git. Stores:
- Your branches (like
main,feature-x, etc.). - Your commits (created by
git commit).
Changes here stay local until pushed.
Remote References
These are read-only snapshots of remote branches (origin/main, upstream/main).
- Updated by
git fetchorgit pull - Written remotely with
git push
Workspace (Working Directory)
Your actual files:
- Tracked: under Git control
- Untracked: new files not yet added
Staging Area (Index)
Buffer between workspace and repo.
git addmarks what will go into the next commit.
Stash Area
Temporary storage for uncommitted work.
git stashsaves itgit stash poprestores it
HEAD
A special pointer to where you currently are.
- Usually points to the tip of the current branch
- Moves forward with each new commit
- Can also point directly to a commit (detached HEAD), useful for exploring history
To explore an old commit without touching any branch, detach HEAD on it, then come back:
git switch --detach <commit>
git switch -
Git Workflows
Think of Git as moving changes between workspace, staging area, local repo, and remotes.
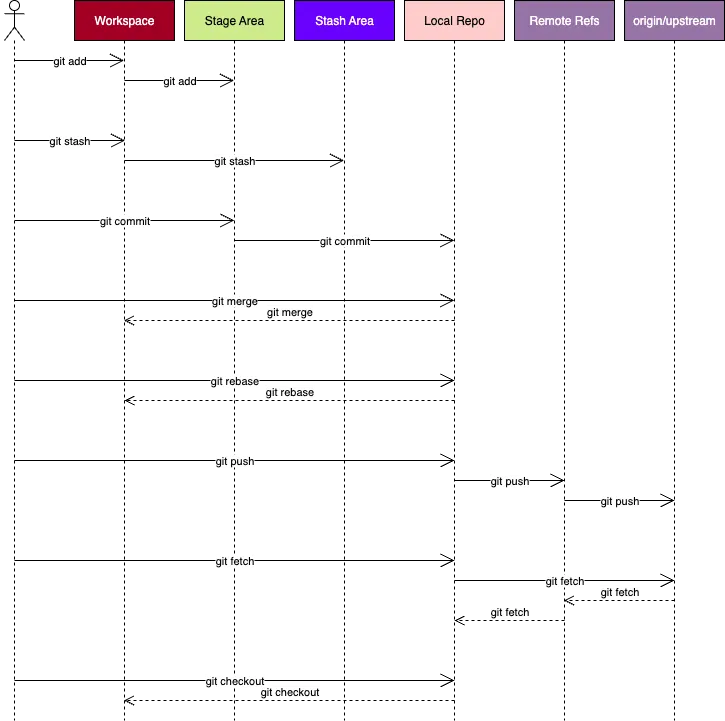 Git workflows
Core Commands
| Command | From | To | What it does |
|---|---|---|---|
git add |
workspace | staging area | Marks changes for the next commit |
git stash |
workspace | stash area | Saves uncommitted changes and cleans the workspace |
git commit |
staging area | local repo | Creates a new commit object |
git merge |
local repo | workspace | Combines histories, may cause conflicts |
git rebase |
local repo | workspace | Rewrites history onto another branch, may cause conflicts |
git push |
local repo | remote repo | Updates remote refs |
git fetch |
remote repo | local repo | Updates remote refs only, no merge/rebase |
git checkout / git switch |
local repo | workspace | Switches branch (git switch is the modern equivalent) |
git pull |
remote repo | workspace | git fetch + git merge (or git rebase with --rebase) |
Useful Additional Commands
| Command | From | To | What it does |
|---|---|---|---|
git cherry-pick |
local repo | workspace | Applies a single commit, may cause conflicts |
git reset |
local repo | staging area / workspace | Moves HEAD, can unstage or undo commits |
git restore |
local repo | workspace | Restores files (modern replacement for git checkout -- <file>) |
git diff |
— | — | Compares changes (workspace vs staging, staging vs repo, or branches) |
git log |
— | — | Shows commit history from the local repo |
git status |
— | — | Shows the current state of workspace and staging area relative to the repo |
Handling Urgent Work
Need to work on something urgent but have uncommitted changes? Don’t reclone or copy the repo.
git stash -u -m "message" # save uncommitted changes in the stash area
git stash pop # restore uncommitted changes from the stash area
-u(--include-untracked) saves untracked files too.-mattaches a message to the stash entry, so you can recognize it later ingit stash list.
This allows you to switch branches safely and return to your work later. The git-stash documentation covers the other subcommands (list, apply, drop).
Keeping Your Feature Branch Up to Date
Long-lived branches are a nightmare in large projects. Split your feature into small, self-contained tasks.
Daily realignment helps avoid conflicts:
git fetch
git rebase origin/development
This ensures you’re always working on the latest code and helps catch conflicts early. For more details, see my previous article.
Submit Your Work with PRs
Before contributing your work, keep in mind a few best practices that make collaboration smoother and history easier to maintain:
- Shared branches should be protected
- Realign your branch with
developmentbefore submitting - Submit work via single-commit PRs
- Use rebase & squash to keep history clean
For more details, see my previous article. PRs gated by review and automated tests are also the entry point of the delivery pipeline I describe in DevOps in Software Development.
Merge vs Rebase: Knowing the Difference
Understanding the difference between merge and rebase deserves a full article, but here’s the key idea:
- Merge combines the histories of two branches, creating a new merge commit. This preserves the full history, but can clutter the branch with extra commits.
- Rebase moves your commits on top of another branch, rewriting history so it looks like your work started from the latest
development. This keeps the history linear and clean, making reviews and tracking changes easier (see Pro Git: Rebasing).
In short: merge preserves history, rebase streamlines it. For daily feature work and submitting PRs, rebase is usually preferred. However, when moving branches from one shared branch to another — like development → release-candidate → main (see previous article) — it’s better to use a PR and create a merge commit. This avoids rewriting shared commit history and potential conflicts. Make sure to clearly comment the merge commit so it’s obvious whether it represents a release-candidate merge, a release merge, or something else — keeping the commit history clear and easy to follow.
Conclusion
Git is powerful, but only if you understand where your changes live and how commands interact with the repository.
In this article we covered:
- why Git is distributed, and what
origin,upstream, and remote refs really are; - the local areas your changes move through: workspace, staging area, stash, and local repo;
- which command moves changes between which areas;
- how to handle urgent work with
git stashinstead of recloning; - how to keep feature branches up to date and submit clean, single-commit pull requests.
Git is less about memorizing commands and more about thinking in terms of its objects and workflows. Mastering these ideas lets you work smarter, not harder, and makes collaboration a joy instead of a headache.
In the next article of this series, I’ll compare merge and rebase in depth: when to use which, and why it matters.
If you enjoyed this article, don’t forget to give it a clap 👏, share it with your friends 🔗, and follow me for more tips and tutorials on software development 📘. Your support helps me create more content like this — thank you! 🙌
Note: English is not my native language, and this article was drafted with the assistance of AI. However, all the ideas, projects, concepts, and content are entirely my own.