How Docker Networking Works
Posted on 28 Jul 2026
Introduction
This is the fourth article of the Getting Started with Docker series. In the previous article we built a custom Nginx image. So far, each container has been an isolated island. In a real application you often have multiple containers that need to talk to each other — a frontend container, a backend container, a database.
This is where Docker networking comes in.
Networking Overview in Docker
Docker has a pluggable networking system. The networking plugins are called drivers. Docker provides these drivers out of the box:
- bridge — the default; creates a private internal network on the host
- host — the container shares the host’s network stack directly
- overlay — connects containers running on different hosts (used in Swarm mode)
- macvlan — assigns a real MAC address to a container, making it appear as a physical device on the network
- ipvlan — similar to macvlan but operates at layer 3; useful when the upstream switch does not allow multiple MACs per port
- none — networking is completely disabled
For this series we focus on bridge, which is what you will use for local development and single-host deployments.
The bridge driver
The bridge driver creates a private network on the host. Containers attached to the same bridge can communicate with each other. External access is granted by publishing ports with -p.
Behind the scenes, Docker creates a Linux bridge interface, assigns IP addresses from a private subnet, and manages iptables rules to route traffic in and out.
There are two kinds of bridge networks:
- default bridge (
bridge) — the one Docker uses automatically when you run a container without specifying a network. Containers can reach each other only by IP address, not by name. - user-defined bridge — created with
docker network create. Containers on the same user-defined bridge can resolve each other by container name via Docker’s built-in DNS. This is the right choice for any multi-container setup.
The host driver
With the host driver the container skips Docker’s network layer entirely and shares the host’s network interfaces. Port mapping (-p) is not needed — if the container listens on port 80, it is directly reachable on the host’s port 80.
Useful for performance-sensitive workloads or tools that need to monitor host network traffic. Note: --network host does not work on Docker Desktop for Mac or Windows — it only works natively on Linux.
The overlay driver
The overlay driver enables containers on different physical hosts to communicate as if they were on the same network. It is the networking backbone for Docker Swarm clusters. We will cover this when we discuss Swarm in a future article.
The macvlan driver
The macvlan driver assigns a MAC address to a container. This makes it appear as a physical device directly on the network segment. It is the right choice for legacy applications that expect to be directly connected to the physical network rather than routed through Docker’s network stack.
Docker Networking Commands
Create a user-defined bridge network:
docker network create my-network
To specify a subnet and gateway explicitly:
docker network create \
  -d bridge \
  --subnet=10.10.1.0/24 \
  --gateway=10.10.1.1 \
  my-network
List all networks:
docker network ls
Inspect a network (shows connected containers, subnet, gateway):
docker network inspect my-network
Remove a network:
docker network rm my-network
Connect a running container to a network:
docker network connect my-network my-container
Practical Example: Frontend and Backend on the Same Network
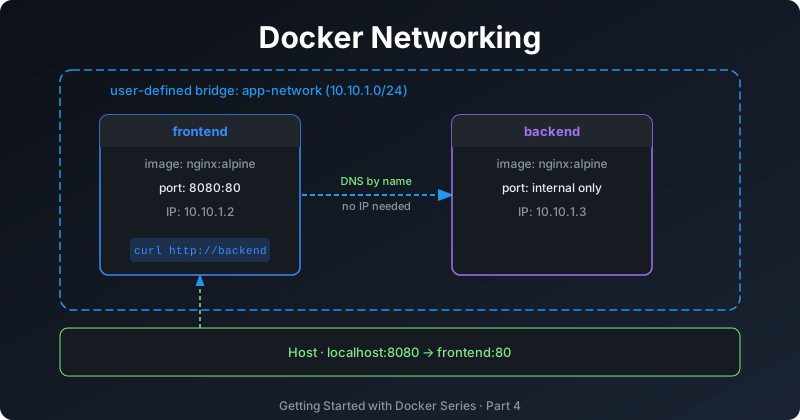
Let us build a concrete example. We will run two containers on the same user-defined bridge network and have them communicate by name — no IP addresses needed.
Create the network
docker network create app-network
Start the “backend” container
For simplicity we use another Nginx instance as a mock backend serving a JSON response.
mkdir backend
cat > backend/index.html << 'EOF'
{"status": "ok", "message": "Hello from the backend!"}
EOF

docker run -d \
  --name backend \
  --network app-network \
  -v $(pwd)/backend:/usr/share/nginx/html:ro \
  nginx:alpine
Start the “frontend” container
mkdir frontend
cat > frontend/index.html << 'EOF'
<!DOCTYPE html>
<html>
  <head><title>Frontend</title></head>
  <body>
    <h1>Frontend container</h1>
    <p>Backend is reachable at http://backend</p>
  </body>
</html>
EOF

docker run -d \
  --name frontend \
  --network app-network \
  -p 8080:80 \
  -v $(pwd)/frontend:/usr/share/nginx/html:ro \
  nginx:alpine
Verify containers can resolve each other by name
docker exec frontend ping -c 3 backend
Because both containers are on the same user-defined bridge network, Docker’s built-in DNS resolves backend to the correct container IP automatically. No need to hardcode IP addresses anywhere.
Open http://localhost:8080 in your browser to see the frontend. The backend is reachable internally at http://backend from within the frontend container.
Clean up
docker rm -f frontend backend
docker network rm app-network
Conclusion
In this article we covered:
- Docker’s five network drivers: bridge, host, overlay, macvlan, ipvlan, and none
- The difference between the default bridge and user-defined bridge networks
- How automatic DNS resolution works on user-defined bridges (containers talk by name, not IP)
- Essential networking commands:
create,ls,inspect,rm,connect - A practical example with frontend and backend containers communicating by name
The next article covers Docker volumes: how to persist data outside a container so it survives restarts and replacements.
If you enjoyed this article, don’t forget to give it a clap 👏, share it with your friends 🔗, and follow me for more tips and tutorials on software development 📘. Your support helps me create more content like this — thank you! 🙌